Zócalo.IO de Autenticación
Estoy tratando de usar Socket.IO en Nodo.js, y estoy tratando de permitir que el servidor para dar una identidad a cada uno de los Socket.IO clientes. Como el código del socket está fuera del alcance del código del servidor http, no tiene fácil acceso a la información de la solicitud enviada, por lo que asumo que deberá enviarse durante la conexión. ¿Cuál es la mejor manera de
1) obtener la información al servidor sobre quién se está conectando a través de Socket.IO
2) autenticar quiénes dicen ser (soy actualmente usando Express, si eso hace las cosas más fáciles)
7 answers
Utilice connect-redis y tenga redis como almacén de sesiones para todos los usuarios autenticados. Asegúrese de que en la autenticación envíe la clave(normalmente req.sessionID) al cliente. Haga que el cliente almacene esta clave en una cookie.
En socket connect (o en cualquier momento posterior) obtenga esta clave de la cookie y envíela de vuelta al servidor. Obtenga la información de la sesión en redis usando esta clave. (OBTENER clave)
Eg:
Del lado del servidor (con redis como almacén de sesiones):
req.session.regenerate...
res.send({rediskey: req.sessionID});
Cliente lado:
//store the key in a cookie
SetCookie('rediskey', <%= rediskey %>); //http://msdn.microsoft.com/en-us/library/ms533693(v=vs.85).aspx

//then when socket is connected, fetch the rediskey from the document.cookie and send it back to server
var socket = new io.Socket();

socket.on('connect', function() {
  var rediskey = GetCookie('rediskey'); //http://msdn.microsoft.com/en-us/library/ms533693(v=vs.85).aspx
  socket.send({rediskey: rediskey});
});
Lado del servidor:
//in io.on('connection')
io.on('connection', function(client) {
  client.on('message', function(message) {

    if(message.rediskey) {
      //fetch session info from redis
      redisclient.get(message.rediskey, function(e, c) {
        client.user_logged_in = c.username;
      });
    }

  });
});
Warning: date(): Invalid date.timezone value 'Europe/Kyiv', we selected the timezone 'UTC' for now. in /var/www/agent_stack/data/www/ajaxhispano.com/template/agent.layouts/content.php on line 61
2013-09-27 08:37:55
También me gustó la forma en que pusherapp hace canales privados.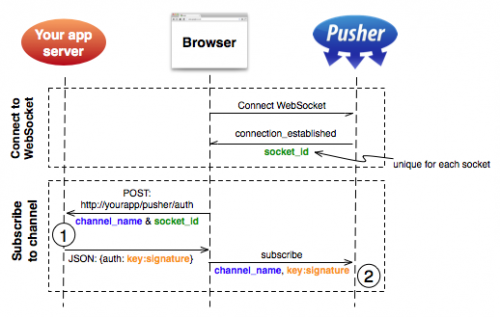
Se genera un id de socket único y enviado al navegador por Empujador. Esto es enviado a su solicitud (1) a través de un Solicitud AJAX que autoriza al usuario para acceder al canal contra su sistema de autenticación existente. Si exitosa su solicitud devuelve un cadena de autorización al navegador firmado con usted Pusher secret. Esto es enviado al Empujador sobre el WebSocket, que completa la autorización (2) si la cadena de autorización coincide.
Porque también socket.io tiene socket_id único para cada socket.
socket.on('connect', function() {
        console.log(socket.transport.sessionid);
});
Usaron cadenas de autorización firmadas para autorizar a los usuarios.
Todavía no he reflejado esto en socket.io, pero creo que podría ser un concepto bastante interesante.
Warning: date(): Invalid date.timezone value 'Europe/Kyiv', we selected the timezone 'UTC' for now. in /var/www/agent_stack/data/www/ajaxhispano.com/template/agent.layouts/content.php on line 61
2011-01-24 14:11:12
Sé que esto es un poco viejo, pero para futuros lectores, además del enfoque de analizar la cookie y recuperar la sesión del almacenamiento (por ejemplo. pasaporte.socketio ) también podría considerar un enfoque basado en tokens.
En este ejemplo utilizo tokens web JSON que son bastante estándar. Debe dar a la página del cliente el token, en este ejemplo imagine un extremo de autenticación que devuelve JWT:
var jwt = require('jsonwebtoken');
// other requires

app.post('/login', function (req, res) {

  // TODO: validate the actual user user
  var profile = {
    first_name: 'John',
    last_name: 'Doe',
    email: '[email protected]',
    id: 123
  };

  // we are sending the profile in the token
  var token = jwt.sign(profile, jwtSecret, { expiresInMinutes: 60*5 });

  res.json({token: token});
});
Ahora, su socket.io el servidor se puede configurar como sigue:
var socketioJwt = require('socketio-jwt');

var sio = socketIo.listen(server);

sio.set('authorization', socketioJwt.authorize({
  secret: jwtSecret,
  handshake: true
}));

sio.sockets
  .on('connection', function (socket) {
     console.log(socket.handshake.decoded_token.email, 'has joined');
     //socket.on('event');
  });
El middleware socket.io-jwt espera el token en una cadena de consulta, por lo que desde el cliente solo tiene que adjuntarlo cuando se conecta:
var socket = io.connect('', {
  query: 'token=' + token
});
Escribí una explicación más detallada sobre este método y las cookies aquí.
Warning: date(): Invalid date.timezone value 'Europe/Kyiv', we selected the timezone 'UTC' for now. in /var/www/agent_stack/data/www/ajaxhispano.com/template/agent.layouts/content.php on line 61
2014-01-16 15:01:17
Este artículo ( http://simplapi.wordpress.com/2012/04/13/php-and-node-js-session-share-redi / ) muestra cómo
- almacenar sesiones del servidor HTTP en Redis (usando Predis)
- obtenga estas sesiones de Redis en el nodo.js por el id de sesión enviado en una cookie
Usando este código, puede obtenerlos socket.io también.
var io = require('socket.io').listen(8081);
var cookie = require('cookie');
var redis = require('redis'), client = redis.createClient();
io.sockets.on('connection', function (socket) {
    var cookies = cookie.parse(socket.handshake.headers['cookie']);
    console.log(cookies.PHPSESSID);
    client.get('sessions/' + cookies.PHPSESSID, function(err, reply) {
        console.log(JSON.parse(reply));
    });
});
Warning: date(): Invalid date.timezone value 'Europe/Kyiv', we selected the timezone 'UTC' for now. in /var/www/agent_stack/data/www/ajaxhispano.com/template/agent.layouts/content.php on line 61
2013-09-25 17:30:22
Aquí está mi intento de que funcione lo siguiente:
- express: 4.14
- socket.io: 1.5
- pasaporte (usando sesiones): 0.3
- redis: 2.6 (Estructura de datos realmente rápida para manejar sesiones; pero también puedes usar otros como MongoDB. Sin embargo, le animo a usar esto para datos de sesión + MongoDB para almacenar otros datos persistentes como Usuarios)
Dado que es posible que desee agregar algunas solicitudes de API también, también use el paquete http para tener tanto HTTP como Web socket trabajando en el mismo puerto.
Servidor.js
El siguiente extracto solo incluye todo lo que necesita para configurar las tecnologías anteriores. Puede ver el servidor completo.versión js que utilicé en uno de mis proyectos aquí.
import http from 'http';
import express from 'express';
import passport from 'passport';
import { createClient as createRedisClient } from 'redis';
import connectRedis from 'connect-redis';
import Socketio from 'socket.io';

// Your own socket handler file, it's optional. Explained below.
import socketConnectionHandler from './sockets';

// Configuration about your Redis session data structure.
const redisClient = createRedisClient();
const RedisStore = connectRedis(Session);
const dbSession = new RedisStore({
  client: redisClient,
  host: 'localhost',
  port: 27017,
  prefix: 'stackoverflow_',
  disableTTL: true
});

// Let's configure Express to use our Redis storage to handle
// sessions as well. You'll probably want Express to handle your
// sessions as well and share the same storage as your socket.io
// does (i.e. for handling AJAX logins).
const session = Session({
  resave: true,
  saveUninitialized: true,
  key: 'SID', // this will be used for the session cookie identifier
  secret: 'secret key',
  store: dbSession
});
app.use(session);

// Let's initialize passport by using their middlewares, which do
//everything pretty much automatically. (you have to configure login
// / register strategies on your own though (see reference 1)
app.use(passport.initialize());
app.use(passport.session());

// Socket.IO
const io = Socketio(server);
io.use((socket, next) => {
  session(socket.handshake, {}, next);
});
io.on('connection', socketConnectionHandler);
// socket.io is ready; remember that ^this^ variable is just the
// name that we gave to our own socket.io handler file (explained
// just after this).

// Start server. This will start both socket.io and our optional
// AJAX API in the given port.
const port = 3000; // Move this onto an environment variable,
                   // it'll look more professional.
server.listen(port);
console.info(`  API listening on port ${port}`);
console.info(` Socket listening on port ${port}`);
Sockets/index.js
Nuestro socketConnectionHandler, simplemente no me gusta poner todo dentro del servidor.js (a pesar de que perfectamente podría), especialmente desde este archivo puede terminar conteniendo bastante código rápidamente.
export default function connectionHandler(socket) {
  const userId = socket.handshake.session.passport &&
                 socket.handshake.session.passport.user;
  // If the user is not logged in, you might find ^this^
  // socket.handshake.session.passport variable undefined.

  // Give the user a warm welcome.
  console.info(`⚡︎ New connection: ${userId}`);
  socket.emit('Grettings', `Grettings ${userId}`);

  // Handle disconnection.
  socket.on('disconnect', () => {
    if (process.env.NODE_ENV !== 'production') {
      console.info(`⚡︎ Disconnection: ${userId}`);
    }
  });
}
Material extra (cliente):
Solo una versión muy básica de lo que el JavaScript socket.io el cliente podría ser:
import io from 'socket.io-client';

const socketPath = '/socket.io'; // <- Default path.
                                 // But you could configure your server
                                // to something like /api/socket.io

const socket = io.connect('localhost:3000', { path: socketPath });
socket.on('connect', () => {
  console.info('Connected');
  socket.on('Grettings', (data) => {
    console.info(`Server gretting: ${data}`);
  });
});
socket.on('connect_error', (error) => {
  console.error(`Connection error: ${error}`);
});
Referencias:
No podía hacer referencia dentro del código, así que lo moví aquí.
1: Cómo configurar sus estrategias de Pasaporte: https://scotch.io/tutorials/easy-node-authentication-setup-and-local#handling-signupregistration
Warning: date(): Invalid date.timezone value 'Europe/Kyiv', we selected the timezone 'UTC' for now. in /var/www/agent_stack/data/www/ajaxhispano.com/template/agent.layouts/content.php on line 61
2016-11-15 19:30:54
Use session y redis entre c/s
// lado del servidor
io.use(function(socket, next) {
 console.log(socket.handshake.headers.cookie); // get here session id and match from redis session data
 next();
});
Warning: date(): Invalid date.timezone value 'Europe/Kyiv', we selected the timezone 'UTC' for now. in /var/www/agent_stack/data/www/ajaxhispano.com/template/agent.layouts/content.php on line 61
2015-07-18 15:06:57
Esto debería hacerlo
//server side

io.sockets.on('connection', function (con) {
  console.log(con.id)
})

//client side

var io = io.connect('http://...')

console.log(io.sessionid)
Warning: date(): Invalid date.timezone value 'Europe/Kyiv', we selected the timezone 'UTC' for now. in /var/www/agent_stack/data/www/ajaxhispano.com/template/agent.layouts/content.php on line 61
2012-05-05 12:29:45