Visualización de gráficos (como yFiles) en JavaFX
Algo como Graphviz pero más específicamente, yFiles.
Quiero un tipo de nodo/borde de visualización de gráfico.
Estaba pensando en hacer el nodo a Circle y el borde a Line. El problema es qué usar para el área donde aparecen los nodos/bordes. Debo usar un ScrollPane, un regular Pane, un Canvas, etc...
Agregaré funcionalidad de desplazamiento, zoom, selección de nodos y arrastre nodos.
Gracias por la ayuda.
4 answers
Tenía 2 horas para matar, así que pensé en intentarlo. Resulta que es fácil crear un prototipo.
Esto es lo que necesitas:
- una clase principal para usar la biblioteca de gráficos que cree
- un gráfico con un modelo de datos
- fácil adición y eliminación de nodos y bordes (resulta que es mejor nombrar las celdas de los nodos para evitar confusiones con los nodos JavaFX durante la programación)
- a plano de desplazamiento con zoom
- a algoritmo de diseño para el gráfico
Es realmente demasiado para ser preguntado, así que simplemente agregaré el código con algunos comentarios.
La aplicación crea instancias del gráfico, agrega celdas y las conecta a través de bordes.
Application/Main.java
package application;

import javafx.application.Application;
import javafx.scene.Scene;
import javafx.scene.layout.BorderPane;
import javafx.stage.Stage;

import com.fxgraph.graph.CellType;
import com.fxgraph.graph.Graph;
import com.fxgraph.graph.Model;
import com.fxgraph.layout.base.Layout;
import com.fxgraph.layout.random.RandomLayout;

public class Main extends Application {

    Graph graph = new Graph();

    @Override
    public void start(Stage primaryStage) {
        BorderPane root = new BorderPane();

        graph = new Graph();

        root.setCenter(graph.getScrollPane());

        Scene scene = new Scene(root, 1024, 768);
        scene.getStylesheets().add(getClass().getResource("application.css").toExternalForm());

        primaryStage.setScene(scene);
        primaryStage.show();

        addGraphComponents();

        Layout layout = new RandomLayout(graph);
        layout.execute();

    }

    private void addGraphComponents() {

        Model model = graph.getModel();

        graph.beginUpdate();

        model.addCell("Cell A", CellType.RECTANGLE);
        model.addCell("Cell B", CellType.RECTANGLE);
        model.addCell("Cell C", CellType.RECTANGLE);
        model.addCell("Cell D", CellType.TRIANGLE);
        model.addCell("Cell E", CellType.TRIANGLE);
        model.addCell("Cell F", CellType.RECTANGLE);
        model.addCell("Cell G", CellType.RECTANGLE);

        model.addEdge("Cell A", "Cell B");
        model.addEdge("Cell A", "Cell C");
        model.addEdge("Cell B", "Cell C");
        model.addEdge("Cell C", "Cell D");
        model.addEdge("Cell B", "Cell E");
        model.addEdge("Cell D", "Cell F");
        model.addEdge("Cell D", "Cell G");

        graph.endUpdate();

    }

    public static void main(String[] args) {
        launch(args);
    }
}
El panel de desplazamiento debe tener un fondo blanco.
Aplicación/aplicación.css
.scroll-pane > .viewport {
   -fx-background-color: white;
}
El panel de desplazamiento con zoom, obtuve la base de código de pixel duke :
ZoomableScrollPane.java
package com.fxgraph.graph;

import javafx.event.EventHandler;
import javafx.scene.Group;
import javafx.scene.Node;
import javafx.scene.control.ScrollPane;
import javafx.scene.input.ScrollEvent;
import javafx.scene.transform.Scale;

public class ZoomableScrollPane extends ScrollPane {
    Group zoomGroup;
    Scale scaleTransform;
    Node content;
    double scaleValue = 1.0;
    double delta = 0.1;

    public ZoomableScrollPane(Node content) {
        this.content = content;
        Group contentGroup = new Group();
        zoomGroup = new Group();
        contentGroup.getChildren().add(zoomGroup);
        zoomGroup.getChildren().add(content);
        setContent(contentGroup);
        scaleTransform = new Scale(scaleValue, scaleValue, 0, 0);
        zoomGroup.getTransforms().add(scaleTransform);

        zoomGroup.setOnScroll(new ZoomHandler());
    }

    public double getScaleValue() {
        return scaleValue;
    }

    public void zoomToActual() {
        zoomTo(1.0);
    }

    public void zoomTo(double scaleValue) {

        this.scaleValue = scaleValue;

        scaleTransform.setX(scaleValue);
        scaleTransform.setY(scaleValue);

    }

    public void zoomActual() {

        scaleValue = 1;
        zoomTo(scaleValue);

    }

    public void zoomOut() {
        scaleValue -= delta;

        if (Double.compare(scaleValue, 0.1) < 0) {
            scaleValue = 0.1;
        }

        zoomTo(scaleValue);
    }

    public void zoomIn() {

        scaleValue += delta;

        if (Double.compare(scaleValue, 10) > 0) {
            scaleValue = 10;
        }

        zoomTo(scaleValue);

    }

    /**
     *
     * @param minimizeOnly
     *            If the content fits already into the viewport, then we don't
     *            zoom if this parameter is true.
     */
    public void zoomToFit(boolean minimizeOnly) {

        double scaleX = getViewportBounds().getWidth() / getContent().getBoundsInLocal().getWidth();
        double scaleY = getViewportBounds().getHeight() / getContent().getBoundsInLocal().getHeight();

        // consider current scale (in content calculation)
        scaleX *= scaleValue;
        scaleY *= scaleValue;

        // distorted zoom: we don't want it => we search the minimum scale
        // factor and apply it
        double scale = Math.min(scaleX, scaleY);

        // check precondition
        if (minimizeOnly) {

            // check if zoom factor would be an enlargement and if so, just set
            // it to 1
            if (Double.compare(scale, 1) > 0) {
                scale = 1;
            }
        }

        // apply zoom
        zoomTo(scale);

    }

    private class ZoomHandler implements EventHandler<ScrollEvent> {

        @Override
        public void handle(ScrollEvent scrollEvent) {
            // if (scrollEvent.isControlDown())
            {

                if (scrollEvent.getDeltaY() < 0) {
                    scaleValue -= delta;
                } else {
                    scaleValue += delta;
                }

                zoomTo(scaleValue);

                scrollEvent.consume();
            }
        }
    }
}
Cada celda se representa como un Panel en el que puede colocar cualquier Nodo como vista (rectángulo, etiqueta, vista de imagen, etc.)
Celda.java
package com.fxgraph.graph;

import java.util.ArrayList;
import java.util.List;

import javafx.scene.Node;
import javafx.scene.layout.Pane;

public class Cell extends Pane {

    String cellId;

    List<Cell> children = new ArrayList<>();
    List<Cell> parents = new ArrayList<>();

    Node view;

    public Cell(String cellId) {
        this.cellId = cellId;
    }

    public void addCellChild(Cell cell) {
        children.add(cell);
    }

    public List<Cell> getCellChildren() {
        return children;
    }

    public void addCellParent(Cell cell) {
        parents.add(cell);
    }

    public List<Cell> getCellParents() {
        return parents;
    }

    public void removeCellChild(Cell cell) {
        children.remove(cell);
    }

    public void setView(Node view) {

        this.view = view;
        getChildren().add(view);

    }

    public Node getView() {
        return this.view;
    }

    public String getCellId() {
        return cellId;
    }
}
Las celdas deben crearse a través de algún tipo de fábrica, por lo que se clasifican por tipo:
Tipo de celda.java
package com.fxgraph.graph;

public enum CellType {

    RECTANGLE,
    TRIANGLE
    ;

}
Instanciarlos es bastante fácil:
RectangleCell.java
package com.fxgraph.cells;

import javafx.scene.paint.Color;
import javafx.scene.shape.Rectangle;

import com.fxgraph.graph.Cell;

public class RectangleCell extends Cell {

    public RectangleCell( String id) {
        super( id);

        Rectangle view = new Rectangle( 50,50);

        view.setStroke(Color.DODGERBLUE);
        view.setFill(Color.DODGERBLUE);

        setView( view);

    }

}
TriangleCell.java
package com.fxgraph.cells;

import javafx.scene.paint.Color;
import javafx.scene.shape.Polygon;

import com.fxgraph.graph.Cell;

public class TriangleCell extends Cell {

    public TriangleCell( String id) {
        super( id);

        double width = 50;
        double height = 50;

        Polygon view = new Polygon( width / 2, 0, width, height, 0, height);

        view.setStroke(Color.RED);
        view.setFill(Color.RED);

        setView( view);

    }

}
Entonces, por supuesto, usted necesito los bordes. Puede usar cualquier conexión que desee, incluso curvas cúbicas. En aras de la simplicidad, utilizo una línea:
Edge.java
package com.fxgraph.graph;

import javafx.scene.Group;
import javafx.scene.shape.Line;

public class Edge extends Group {

    protected Cell source;
    protected Cell target;

    Line line;

    public Edge(Cell source, Cell target) {

        this.source = source;
        this.target = target;

        source.addCellChild(target);
        target.addCellParent(source);

        line = new Line();

        line.startXProperty().bind( source.layoutXProperty().add(source.getBoundsInParent().getWidth() / 2.0));
        line.startYProperty().bind( source.layoutYProperty().add(source.getBoundsInParent().getHeight() / 2.0));

        line.endXProperty().bind( target.layoutXProperty().add( target.getBoundsInParent().getWidth() / 2.0));
        line.endYProperty().bind( target.layoutYProperty().add( target.getBoundsInParent().getHeight() / 2.0));

        getChildren().add( line);

    }

    public Cell getSource() {
        return source;
    }

    public Cell getTarget() {
        return target;
    }

}
Una extensión de esto sería unir el borde a los puertos (norte/sur/este/oeste) de las celdas.
Entonces querrías arrastrar los nodos, así que tendrías que añadir algunos gestos de ratón. La parte importante es considerar un factor de zoom en caso de que el lienzo del gráfico se amplíe
MouseGestures.java
package com.fxgraph.graph;

import javafx.event.EventHandler;
import javafx.scene.Node;
import javafx.scene.input.MouseEvent;

public class MouseGestures {

    final DragContext dragContext = new DragContext();

    Graph graph;

    public MouseGestures( Graph graph) {
        this.graph = graph;
    }

    public void makeDraggable( final Node node) {


        node.setOnMousePressed(onMousePressedEventHandler);
        node.setOnMouseDragged(onMouseDraggedEventHandler);
        node.setOnMouseReleased(onMouseReleasedEventHandler);

    }

    EventHandler<MouseEvent> onMousePressedEventHandler = new EventHandler<MouseEvent>() {

        @Override
        public void handle(MouseEvent event) {

            Node node = (Node) event.getSource();

            double scale = graph.getScale();

            dragContext.x = node.getBoundsInParent().getMinX() * scale - event.getScreenX();
            dragContext.y = node.getBoundsInParent().getMinY()  * scale - event.getScreenY();

        }
    };

    EventHandler<MouseEvent> onMouseDraggedEventHandler = new EventHandler<MouseEvent>() {

        @Override
        public void handle(MouseEvent event) {

            Node node = (Node) event.getSource();

            double offsetX = event.getScreenX() + dragContext.x;
            double offsetY = event.getScreenY() + dragContext.y;

            // adjust the offset in case we are zoomed
            double scale = graph.getScale();

            offsetX /= scale;
            offsetY /= scale;

            node.relocate(offsetX, offsetY);

        }
    };

    EventHandler<MouseEvent> onMouseReleasedEventHandler = new EventHandler<MouseEvent>() {

        @Override
        public void handle(MouseEvent event) {

        }
    };

    class DragContext {

        double x;
        double y;

    }
}
Entonces necesita un modelo en que usted almacena las celdas y los bordes. En cualquier momento se pueden agregar nuevas celdas y se pueden eliminar las existentes. Debe procesarlos distinguiéndolos de los existentes (por ejemplo, para agregar gestos de ratón, animarlos cuando los agregue, etc.). Cuando implemente el algoritmo de diseño, se enfrentará a la determinación de un nodo raíz. Por lo tanto, debe hacer un nodo raíz invisible (graphParent) que no se agregará al gráfico en sí, pero en el que comienzan todos los nodos que no tienen una padre.
Modelo.java
package com.fxgraph.graph;

import java.util.ArrayList;
import java.util.HashMap;
import java.util.List;
import java.util.Map;

import com.fxgraph.cells.TriangleCell;
import com.fxgraph.cells.RectangleCell;

public class Model {

    Cell graphParent;

    List<Cell> allCells;
    List<Cell> addedCells;
    List<Cell> removedCells;

    List<Edge> allEdges;
    List<Edge> addedEdges;
    List<Edge> removedEdges;

    Map<String,Cell> cellMap; // <id,cell>

    public Model() {

         graphParent = new Cell( "_ROOT_");

         // clear model, create lists
         clear();
    }

    public void clear() {

        allCells = new ArrayList<>();
        addedCells = new ArrayList<>();
        removedCells = new ArrayList<>();

        allEdges = new ArrayList<>();
        addedEdges = new ArrayList<>();
        removedEdges = new ArrayList<>();

        cellMap = new HashMap<>(); // <id,cell>

    }

    public void clearAddedLists() {
        addedCells.clear();
        addedEdges.clear();
    }

    public List<Cell> getAddedCells() {
        return addedCells;
    }

    public List<Cell> getRemovedCells() {
        return removedCells;
    }

    public List<Cell> getAllCells() {
        return allCells;
    }

    public List<Edge> getAddedEdges() {
        return addedEdges;
    }

    public List<Edge> getRemovedEdges() {
        return removedEdges;
    }

    public List<Edge> getAllEdges() {
        return allEdges;
    }

    public void addCell(String id, CellType type) {

        switch (type) {

        case RECTANGLE:
            RectangleCell rectangleCell = new RectangleCell(id);
            addCell(rectangleCell);
            break;

        case TRIANGLE:
            TriangleCell circleCell = new TriangleCell(id);
            addCell(circleCell);
            break;

        default:
            throw new UnsupportedOperationException("Unsupported type: " + type);
        }
    }

    private void addCell( Cell cell) {

        addedCells.add(cell);

        cellMap.put( cell.getCellId(), cell);

    }

    public void addEdge( String sourceId, String targetId) {

        Cell sourceCell = cellMap.get( sourceId);
        Cell targetCell = cellMap.get( targetId);

        Edge edge = new Edge( sourceCell, targetCell);

        addedEdges.add( edge);

    }

    /**
     * Attach all cells which don't have a parent to graphParent
     * @param cellList
     */
    public void attachOrphansToGraphParent( List<Cell> cellList) {

        for( Cell cell: cellList) {
            if( cell.getCellParents().size() == 0) {
                graphParent.addCellChild( cell);
            }
        }

    }

    /**
     * Remove the graphParent reference if it is set
     * @param cellList
     */
    public void disconnectFromGraphParent( List<Cell> cellList) {

        for( Cell cell: cellList) {
            graphParent.removeCellChild( cell);
        }
    }

    public void merge() {

        // cells
        allCells.addAll( addedCells);
        allCells.removeAll( removedCells);

        addedCells.clear();
        removedCells.clear();

        // edges
        allEdges.addAll( addedEdges);
        allEdges.removeAll( removedEdges);

        addedEdges.clear();
        removedEdges.clear();

    }
}
Y luego está el gráfico en sí que contiene el panel de desplazamiento con zoom, el modelo, etc. En el gráfico se manejan los nodos añadidos y eliminados (gestos de ratón, celdas y bordes añadidos al panel de desplazamiento, etc.).
Gráfico.java
package com.fxgraph.graph;

import javafx.scene.Group;
import javafx.scene.control.ScrollPane;
import javafx.scene.layout.Pane;

public class Graph {

    private Model model;

    private Group canvas;

    private ZoomableScrollPane scrollPane;

    MouseGestures mouseGestures;

    /**
     * the pane wrapper is necessary or else the scrollpane would always align
     * the top-most and left-most child to the top and left eg when you drag the
     * top child down, the entire scrollpane would move down
     */
    CellLayer cellLayer;

    public Graph() {

        this.model = new Model();

        canvas = new Group();
        cellLayer = new CellLayer();

        canvas.getChildren().add(cellLayer);

        mouseGestures = new MouseGestures(this);

        scrollPane = new ZoomableScrollPane(canvas);

        scrollPane.setFitToWidth(true);
        scrollPane.setFitToHeight(true);

    }

    public ScrollPane getScrollPane() {
        return this.scrollPane;
    }

    public Pane getCellLayer() {
        return this.cellLayer;
    }

    public Model getModel() {
        return model;
    }

    public void beginUpdate() {
    }

    public void endUpdate() {

        // add components to graph pane
        getCellLayer().getChildren().addAll(model.getAddedEdges());
        getCellLayer().getChildren().addAll(model.getAddedCells());

        // remove components from graph pane
        getCellLayer().getChildren().removeAll(model.getRemovedCells());
        getCellLayer().getChildren().removeAll(model.getRemovedEdges());

        // enable dragging of cells
        for (Cell cell : model.getAddedCells()) {
            mouseGestures.makeDraggable(cell);
        }

        // every cell must have a parent, if it doesn't, then the graphParent is
        // the parent
        getModel().attachOrphansToGraphParent(model.getAddedCells());

        // remove reference to graphParent
        getModel().disconnectFromGraphParent(model.getRemovedCells());

        // merge added & removed cells with all cells
        getModel().merge();

    }

    public double getScale() {
        return this.scrollPane.getScaleValue();
    }
}
Una envoltura para la capa de celdas. Es probable que desee agregar varias capas (por ejemplo, una capa de selección que resalta las celdas seleccionadas)
CellLayer.java
package com.fxgraph.graph;

import javafx.scene.layout.Pane;

public class CellLayer extends Pane {

}
Ahora necesitas un diseño para las celdas. Sugiero crear una clase abstracta simple que se extenderá a medida que desarrolle el gráfico.
package com.fxgraph.layout.base;

public abstract class Layout {

    public abstract void execute();

}
En aras de la simplicidad, aquí hay un algoritmo de diseño simple en el que se utilizan coordenadas aleatorias. Por supuesto, tendrías que hacer cosas más complejas como diseños de árboles, etc.
RandomLayout.java
package com.fxgraph.layout.random;

import java.util.List;
import java.util.Random;

import com.fxgraph.graph.Cell;
import com.fxgraph.graph.Graph;
import com.fxgraph.layout.base.Layout;

public class RandomLayout extends Layout {

    Graph graph;

    Random rnd = new Random();

    public RandomLayout(Graph graph) {

        this.graph = graph;

    }

    public void execute() {

        List<Cell> cells = graph.getModel().getAllCells();

        for (Cell cell : cells) {

            double x = rnd.nextDouble() * 500;
            double y = rnd.nextDouble() * 500;

            cell.relocate(x, y);

        }

    }

}
El ejemplo se ve así:
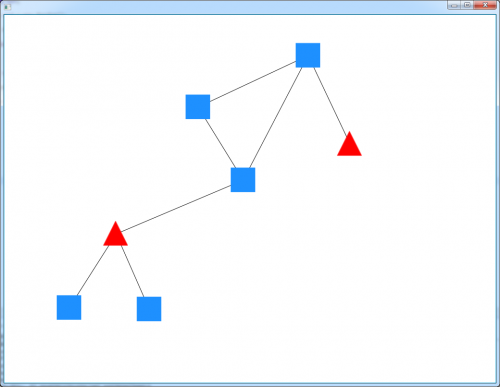
Puede arrastrar las celdas con el botón del ratón y acercar y alejar con el ratón rueda.
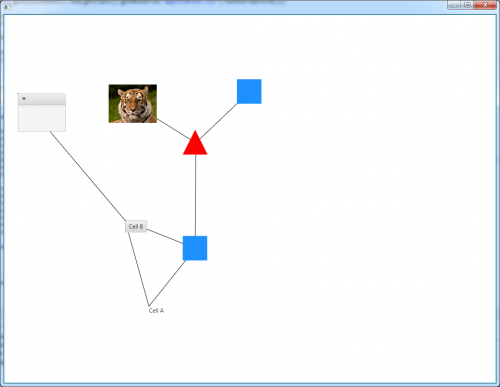
Agregar nuevos tipos de celdas es tan fácil como crear subclases de celdas:{[18]]}
package com.fxgraph.cells;

import javafx.scene.control.Button;

import com.fxgraph.graph.Cell;

public class ButtonCell extends Cell {

    public ButtonCell(String id) {
        super(id);

        Button view = new Button(id);

        setView(view);

    }

}

package com.fxgraph.cells;

import javafx.scene.image.ImageView;

import com.fxgraph.graph.Cell;

public class ImageCell extends Cell {

    public ImageCell(String id) {
        super(id);

        ImageView view = new ImageView("http://upload.wikimedia.org/wikipedia/commons/thumb/4/41/Siberischer_tiger_de_edit02.jpg/800px-Siberischer_tiger_de_edit02.jpg");
        view.setFitWidth(100);
        view.setFitHeight(80);

        setView(view);

    }

}


package com.fxgraph.cells;

import javafx.scene.control.Label;

import com.fxgraph.graph.Cell;

public class LabelCell extends Cell {

    public LabelCell(String id) {
        super(id);

        Label view = new Label(id);

        setView(view);

    }

}

package com.fxgraph.cells;

import javafx.scene.control.TitledPane;

import com.fxgraph.graph.Cell;

public class TitledPaneCell extends Cell {

    public TitledPaneCell(String id) {
        super(id);

        TitledPane view = new TitledPane();
        view.setPrefSize(100, 80);

        setView(view);

    }

}
Y creando los tipos
package com.fxgraph.graph;

public enum CellType {

    RECTANGLE,
    TRIANGLE,
    LABEL,
    IMAGE,
    BUTTON,
    TITLEDPANE
    ;

}
Y creando instancias dependiendo del tipo:
...
public void addCell(String id, CellType type) {

    switch (type) {

    case RECTANGLE:
        RectangleCell rectangleCell = new RectangleCell(id);
        addCell(rectangleCell);
        break;

    case TRIANGLE:
        TriangleCell circleCell = new TriangleCell(id);
        addCell(circleCell);
        break;

    case LABEL:
        LabelCell labelCell = new LabelCell(id);
        addCell(labelCell);
        break;

    case IMAGE:
        ImageCell imageCell = new ImageCell(id);
        addCell(imageCell);
        break;

    case BUTTON:
        ButtonCell buttonCell = new ButtonCell(id);
        addCell(buttonCell);
        break;

    case TITLEDPANE:
        TitledPaneCell titledPaneCell = new TitledPaneCell(id);
        addCell(titledPaneCell);
        break;

    default:
        throw new UnsupportedOperationException("Unsupported type: " + type);
    }
}
...
Y obtendrás esto{[18]]}
Warning: date(): Invalid date.timezone value 'Europe/Kyiv', we selected the timezone 'UTC' for now. in /var/www/agent_stack/data/www/ajaxhispano.com/template/agent.layouts/content.php on line 61
2015-06-07 18:19:45
Tuve el mismo problema, me las arreglé para usar el javascript vis.biblioteca js junto con JavaFX WebView.
Puedes echarle un vistazo en github si eso es útil para alguien: https://github.com/arocketman/VisFX
Warning: date(): Invalid date.timezone value 'Europe/Kyiv', we selected the timezone 'UTC' for now. in /var/www/agent_stack/data/www/ajaxhispano.com/template/agent.layouts/content.php on line 61
2018-01-27 12:04:45
Le daría Prefux una oportunidad. Es una bifurcación del proyecto Prefuse. El repositorio original es https://github.com/effrafax/Prefux , pero la bifurcación más mantenida parece ser https://github.com/jchildress/Prefux. https://github.com/gedeffe/Prefuse también parece estar activo, pero no conectado con jchildress.
Warning: date(): Invalid date.timezone value 'Europe/Kyiv', we selected the timezone 'UTC' for now. in /var/www/agent_stack/data/www/ajaxhispano.com/template/agent.layouts/content.php on line 61
2016-09-13 20:12:49
Puede usar la api jfreechart para generar visualización de gráficos
Proporciona, Línea , Pastel, barras. y es muy difícil de usar.
Warning: date(): Invalid date.timezone value 'Europe/Kyiv', we selected the timezone 'UTC' for now. in /var/www/agent_stack/data/www/ajaxhispano.com/template/agent.layouts/content.php on line 61
2015-06-06 05:08:27