ActionBar-vista personalizada con ImageView centrado, Elementos de acción en los lados
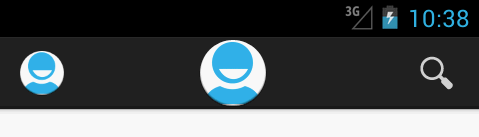
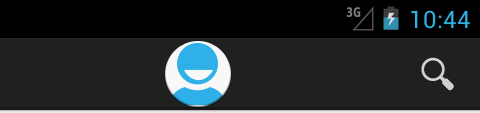
Tengo el requisito de centrar un logotipo personalizado (usando una ImageView) en la Barra de acción para la actividad "Inicio". Estoy usando ABS para este proyecto. Esto es muy similar a otra pregunta publicada en S. O. (logotipo de ActionBar centrado y elementos de Acción en los lados), pero no estoy seguro de si el ImageView o el menú de búsqueda hacen una diferencia, ya que no estoy obteniendo los resultados que estoy buscando (una imagen centrada), o si simplemente lo he entendido mal. Básicamente, establezco un icono a la izquierda, inserte la vista personalizada en el centro, y tiene un icono de búsqueda a la derecha (OptionsMenu). La imagen aparece un poco a la derecha del icono, pero sigue estando centrada a la izquierda. Cualquier sugerencia sobre cómo centrar una ImageView en la barra de acción sería muy apreciada.
Hogar.java:
public void onCreate(Bundle savedInstanceState) {
    super.onCreate(savedInstanceState);
    setContentView(R.layout.activity_home);

    LayoutInflater inflater = (LayoutInflater) getSupportActionBar().getThemedContext()
            .getSystemService(LAYOUT_INFLATER_SERVICE);

    final View customActionBarView = inflater.inflate(
            R.layout.actionbar_custom_view_home, null);

    /* Show the custom action bar view and hide the normal Home icon and title */
    final ActionBar actionBar = getSupportActionBar();
    actionBar.setHomeButtonEnabled(true);
    actionBar.setDisplayHomeAsUpEnabled(false);
    actionBar.setDisplayShowTitleEnabled(false);
    actionBar.setIcon(R.drawable.ic_ab_som);
    actionBar.setCustomView(customActionBarView);
    actionBar.setDisplayShowCustomEnabled(true);

}

@Override
public boolean onCreateOptionsMenu(Menu menu) {
    MenuInflater inflater = new MenuInflater(this);
    inflater.inflate(R.menu.search, menu);
    return true;
}
Res/layout/actionbar_custom_view_home.xml:
<?xml version="1.0" encoding="utf-8"?>
<LinearLayout xmlns:android="http://schemas.android.com/apk/res/android"
android:layout_width="fill_parent"
android:layout_height="wrap_content"
android:orientation="horizontal"
android:layout_gravity="center">

<ImageView
    android:id="@+id/actionBarLogo"
    android:contentDescription="@string/application_name"
    android:layout_width="wrap_content"
    android:layout_height="wrap_content"
    android:clickable="false"
    android:duplicateParentState="false"
    android:focusable="false"
    android:longClickable="false"
    android:padding="@dimen/padding_small"
    android:src="@drawable/logo_horizontal" />

</LinearLayout>
Res/menu/search.xml:
<?xml version="1.0" encoding="utf-8"?>
<menu xmlns:android="http://schemas.android.com/apk/res/android">
    <item
        android:id="@id/search_item"
        android:icon="?attr/action_search"
        android:title="@string/search_label"
        android:showAsAction="ifRoom|collapseActionView">
    </item>
</menu>
7 answers
Explicado:
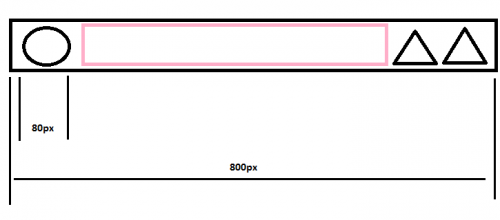
El contenedor rosa, es el espacio real donde agregará la vista.
El truco es hacer algunas matemáticas, para centrar la vista (lo que sea) en el centro.
En mi caso, la vista era una vista de texto. Aquí está mi método completo:
public void addTextToActionBar( String textToSet )
{
    mActionbar.setDisplayShowCustomEnabled( true );

    // Inflate the custom view
    LayoutInflater inflater = LayoutInflater.from( this );
    View header = inflater.inflate( R.layout.actionbar_header, null );

    //Here do whatever you need to do with the view (set text if it's a textview or whatever)
    TextView tv = (TextView) header.findViewById( R.id.program_title );
    tv.setText( textToSet );

    // Magic happens to center it.
    int actionBarWidth = DeviceHelper.getDeviceWidth( this ); //Google for this method. Kinda easy.

    tv.measure( 0, 0 );
    int tvSize = tv.getMeasuredWidth();

    try
    {
        int leftSpace = 0;

        View homeButton = findViewById( android.R.id.home );
        final ViewGroup holder = (ViewGroup) homeButton.getParent();

        View firstChild =  holder.getChildAt( 0 );
        View secondChild =  holder.getChildAt( 1 );

        leftSpace = firstChild.getWidth()+secondChild.getWidth();
    }
    catch ( Exception ignored )
    {}

    mActionbar.setCustomView( header );

    if ( null != header )
    {
        ActionBar.LayoutParams params = (ActionBar.LayoutParams) header.getLayoutParams();

        if ( null != params )
        {
            int leftMargin =  ( actionBarWidth / 2 - ( leftSpace ) ) - ( tvSize / 2 ) ;

            params.leftMargin = 0 >= leftMargin ? 0 : leftMargin;
        }
    }
}
Disposición:
<RelativeLayout
    xmlns:android="http://schemas.android.com/apk/res/android"
    android:layout_width="match_parent"
    android:layout_height="wrap_content"
    android:gravity="center_horizontal|center_vertical|center"
    android:orientation="horizontal" >

<TextView
    android:id="@+id/program_title"
    android:layout_width="wrap_content"
    android:layout_height="wrap_content"
    android:textColor="@android:color/white"
    android:contentDescription="@string/content_description_program_title"
    android:ellipsize="end"
    android:maxLines="1"
    android:textSize="22sp"/>

</RelativeLayout>
Disfruta.
Warning: date(): Invalid date.timezone value 'Europe/Kyiv', we selected the timezone 'UTC' for now. in /var/www/agent_stack/data/www/ajaxhispano.com/template/agent.layouts/content.php on line 61
2014-07-19 20:48:29
Si desea imageview en el centro de ActionBar, use:
Simplemente reemplace getActionBar(); a getSupportActionBar(); en el siguiente código
public void onCreate(Bundle savedInstanceState) {
        super.onCreate(savedInstanceState);
        setContentView(R.layout.activity_main);

        final ActionBar actionBar = getActionBar();
        actionBar.setCustomView(R.layout.actionbar_custom_view_home);
        actionBar.setDisplayShowTitleEnabled(false);
        actionBar.setDisplayShowCustomEnabled(true);
    }

    @Override
    public boolean onCreateOptionsMenu(Menu menu) {
        getMenuInflater().inflate(R.menu.activity_main, menu);
        return true;
    }
Tu actionbar_custom_view_home.xml
<?xml version="1.0" encoding="utf-8"?>
<LinearLayout xmlns:android="http://schemas.android.com/apk/res/android"
    android:layout_width="fill_parent"
    android:layout_height="wrap_content"
    android:gravity="center"
    android:orientation="horizontal" >

    <ImageView
        android:id="@+id/actionBarLogo"
        android:layout_width="wrap_content"
        android:layout_height="wrap_content"
        android:clickable="false"
        android:focusable="false"
        android:longClickable="false"
        android:src="@drawable/ic_launcher" />

</LinearLayout>
Ocultar el icono de la Barra de acción
final ActionBar actionBar = getActionBar();
actionBar.setCustomView(R.layout.actionbar_custom_view_home);
actionBar.setDisplayShowTitleEnabled(false);
actionBar.setDisplayShowCustomEnabled(true);
actionBar.setDisplayUseLogoEnabled(false);
actionBar.setDisplayShowHomeEnabled(false);
Nota: para 11 API use getActionBar()
EDITADO: 02/03/16 para Barra de herramientas
<android.support.v7.widget.Toolbar
   style="@style/ToolBarStyle"
   xmlns:android="http://schemas.android.com/apk/res/android"
   android:layout_width="match_parent"
   android:layout_height="wrap_content"
   android:background="?attr/colorPrimary"
   android:minHeight="@dimen/abc_action_bar_default_height_material">

    <ImageView
        android:layout_width="wrap_content"
        android:contentDescription="@string/logo"
        android:layout_height="wrap_content"
        android:layout_gravity="center"
        android:src="@drawable/ic_launcher"/>

 </android.support.v7.widget.Toolbar>
Warning: date(): Invalid date.timezone value 'Europe/Kyiv', we selected the timezone 'UTC' for now. in /var/www/agent_stack/data/www/ajaxhispano.com/template/agent.layouts/content.php on line 61
2016-02-03 03:49:58
Me encontré con este problema,aquí está mi solución:
   ActionBar.LayoutParams layoutParams = new  ActionBar.LayoutParams(ActionBar.LayoutParams.MATCH_PARENT,
ActionBar.LayoutParams.MATCH_PARENT);
   layoutParams.gravity = Gravity.CENTER_HORIZONTAL|Gravity.CENTER_HORIZONTAL;
    actionBar.setCustomView(yourCustomView,layoutParams);
Warning: date(): Invalid date.timezone value 'Europe/Kyiv', we selected the timezone 'UTC' for now. in /var/www/agent_stack/data/www/ajaxhispano.com/template/agent.layouts/content.php on line 61
2014-10-31 08:08:37
El ImageView en su código está centrado en relación con el LinearLayout, no con la Barra de Acciones. Puedes agregar margen izquierdo (android: layout_marginLeft) al diseño para ajustar la posición de la imagen.
Otra forma de hacerlo no es agregar un icono y elementos de acción a la Barra de acciones, sino usar un diseño personalizado con icono y botones dentro. Pero tendrá que manejar los elementos de acción usted mismo en ese caso.
Warning: date(): Invalid date.timezone value 'Europe/Kyiv', we selected the timezone 'UTC' for now. in /var/www/agent_stack/data/www/ajaxhispano.com/template/agent.layouts/content.php on line 61
2013-04-16 01:03:29
Lo único que encontré funcionando es poner (poner a la derecha o a la izquierda según sea necesario, o ambos):
android:layout_marginLeft|Right="?attr/actionBarSize"
Que encontré aquí: http://sourcey.com/android-custom-centered-actionbar-with-material-design /
Warning: date(): Invalid date.timezone value 'Europe/Kyiv', we selected the timezone 'UTC' for now. in /var/www/agent_stack/data/www/ajaxhispano.com/template/agent.layouts/content.php on line 61
2015-12-10 10:43:40
Llega tarde a la fiesta, pero en caso de que ayude a alguien más, use una lista de capas y póngala como fondo. De lo contrario, el logotipo se centrará en función del espacio restante, no en toda la barra de herramientas como menciona Reinherd.
Puede usar una lista de capas con un color de fondo estático y una imagen con gravedad establecida en el centro como se muestra a continuación. Espero que ayude!
Barra de herramientas.axml
<android.support.v7.widget.Toolbar
    xmlns:android="http://schemas.android.com/apk/res/android"
    xmlns:app="http://schemas.android.com/apk/res-auto"
    android:id="@+id/toolbar"
    android:layout_width="match_parent"
    android:layout_height="?attr/actionBarSize"
    android:background="@drawable/toolbar_background"
    android:theme="@style/ThemeOverlay.AppCompat.Dark"
    app:popupTheme="@style/ThemeOverlay.AppCompat.Light"
    app:layout_scrollFlags="scroll|enterAlways"
    app:layout_collapseMode="pin">
</android.support.v7.widget.Toolbar>
Toolbar_background.xml
<layer-list xmlns:android="http://schemas.android.com/apk/res/android">
  <item>
    <shape android:shape="rectangle">
      <solid android:color="@color/colorPrimary" />
    </shape>
  </item>
  <item>
    <bitmap android:src="@drawable/logo" android:gravity="center" />
  </item>
</layer-list>
Warning: date(): Invalid date.timezone value 'Europe/Kyiv', we selected the timezone 'UTC' for now. in /var/www/agent_stack/data/www/ajaxhispano.com/template/agent.layouts/content.php on line 61
2016-03-18 18:05:41
Me enfrento al mismo problema y sugiero la siguiente solución:
-
En su res/layout/actionbar_custom_view_home.xml cambia el ancho del layout a wrap_content:
android:layout_width="wrap_content" -
Obtenga el ancho de la barra de acción de esta manera:
Display display = getWindowManager().getDefaultDisplay(); Point size = new Point(); display.getSize(size); //width of action bar is the same as width of whole screen final int actionBarWidth = size.x; -
Agregue layoutListener a su customActionBarView:
customActionBarView.addOnLayoutChangeListener(
  new OnLayoutChangeListener() {

    @Override
    public void onGlobalLayout() {
      float x = customActionBarView.getX();
      int logoImageWidth = imageLogo.getWidth();
      int logoPosition = actionBarWidth / 2 - logoImageWidth / 2;
      if (x != logoPosition) {
        customActionBarView.setX(logoPosition);
        customActionBarView.requestLayout();
      } else {
        customActionBarView.removeOnLayoutChangeListener(this);
      }
    }
  }
);
Warning: date(): Invalid date.timezone value 'Europe/Kyiv', we selected the timezone 'UTC' for now. in /var/www/agent_stack/data/www/ajaxhispano.com/template/agent.layouts/content.php on line 61
2015-03-05 14:30:53